

Table of Contents
- Why Deep Clean Your Gas Grill (Safety and Performance)
- Best Tools for Cleaning a Gas Grill
- Step-by-Step: How to Deep Clean a Gas Grill
- How to Clean Burner Tubes and Venturi Tubes
- Visual Inspection Checklist: When to Clean vs. Replace
- Gas Grill Maintenance Schedule: Monthly, Seasonal, and Annual
- Frequently Asked Questions
Last Updated: September 16, 2026
Why Deep Clean Your Gas Grill (Safety and Performance)
Learning how to deep clean gas grill components protects two things at once: your food and your equipment. A clean grill heats evenly, ignites faster, and lasts longer, while a neglected one builds carbon residue that traps old flavors and blocks airflow.
Best Tools for Cleaning a Gas Grill
The right tool depends on what your grill is made of. Using the wrong brush on the wrong surface is the fastest way to scratch a finish, widen a gas port, or void a warranty. Before you buy anything, identify your grate and cookbox materials.
Match the Tool to the Material
Porcelain-enameled grates and cookbox: These have a glass-like coating that chips if you attack it with metal. Use a nylon-bristle grill brush, a plastic scraper, and a non-abrasive sponge. Never use a wire brush, steel wool, or a metal putty knife on enamel. Chipped enamel exposes the steel underneath, which then rusts from the inside out.
Must-Have Tools and Safety Gear
- Safety gear: heat-resistant gloves and protective eyewear. Degreaser splatter and loosened carbon are real hazards, especially when you brush overhead surfaces.
- Brushes: a nylon grill brush for enamel, a stainless-steel-bristle brush for stainless and cast iron, and a small detail brush for burner ports.
- Scrapers: a plastic paint scraper for the cookbox and drip pan. Never a metal blade on coated surfaces.
- Soaking supplies: a shallow pan or heavy-duty trash bag for soaking grates and flavorizer bars in hot soapy water.
- Wiping supplies: microfiber cloths for stainless and painted surfaces, paper towels for grease-heavy residue.
- Port-clearing tool: a straightened paper clip or a dedicated burner port cleaning wire. Do not use a drill bit; it removes metal and enlarges the port.
Eco-Friendly Cleaning Alternatives
Many grill owners now skip harsh chemical degreasers entirely. A common approach is a paste of baking soda and water for light residue, white vinegar for mineral film, and plain steam for baked-on grease. Steam is the most effective chemical-free option because heat does the dissolving work, which is exactly the principle behind Grill Daddy's steam-cleaning brushes: preheat, fill the reservoir, and let the steam lift grime from stainless steel, ceramic, or iron grates without abrasives.
| Tool | Best For | Avoid On |
|---|---|---|
| Wire brush | Cast iron grates | Porcelain-enameled surfaces |
| Nylon brush | Porcelain-enameled grates | Heavy carbon buildup |
| Steam brush | All grate types | Nothing, safe on every finish |
| Plastic scraper | Cookbox, drip pan | Nothing |
| Steel wool | Stainless steel spots | Porcelain, painted lids |
| Paper clip | Burner ports | Nothing, but do not enlarge ports |
Step-by-Step: How to Deep Clean a Gas Grill
A full deep clean takes about 45 to 60 minutes and follows seven steps: burn-off, cool-down, grate cleaning, flavorizer bar and cookbox cleaning, grease tray service, burner tube clearing, and exterior wipe-down. Work in that order and each step makes the next one easier.
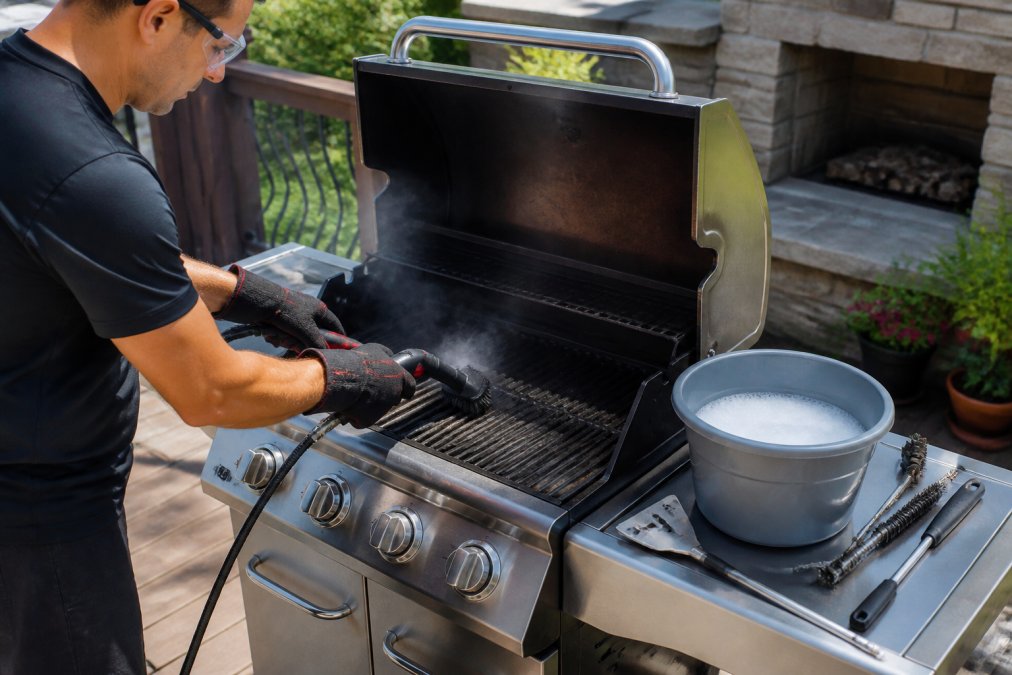
Safety Precautions and Cool-Down
- Close the gas supply at the propane tank or natural gas line valve before anything else.
- Turn all burner knobs to the off position and confirm the igniter is not cycling.
- Wait until the grill is completely cool to the touch, usually at least an hour after shutoff.
- Never clean a grill with the lid closed or while any part is still warm enough to sizzle water.
Cleaning the Cooking Grates
- Run a 10 to 15 minute burn-off on high heat with the lid closed to turn residue to ash.
- Let the grates cool, then remove them and set them on cardboard or newspaper.
- Scrub with your brush or steam tool, then soak heavily soiled grates in hot soapy water for 15 minutes.
- Rinse, dry completely, and set aside. Skipping the dry step invites rust.
Cleaning Flavorizer Bars, Cookbox, and Grease Tray
- Lift out the flavorizer bars and scrape both sides with a plastic scraper.
- Scrape the cookbox walls and floor, angling debris toward the drain hole.
- Slide out the grease tray and drip pan, empty them, and scrub with hot soapy water.
- Reassemble once every part is fully dry.
Cleaning the Exterior Lid and Side Shelves
- Wipe the lid and side shelves with warm soapy water and a microfiber cloth.
- For stainless steel, wipe with the grain to avoid scratching the finish.
- Dry immediately to prevent water spots and corrosion.
How to Clean Burner Tubes and Venturi Tubes
Burner tubes are the most overlooked part of a gas grill, and they are the most common cause of uneven heat, weak flames, and ignition problems. Cleaning them means removing each tube, clearing every port, and checking the venturi tubes where they meet the gas valves. Blocked ports cause uneven flames and poor heat distribution; blocked venturi tubes can cause a dangerous flashback fire at the control panel.
Diagnose Before You Disassemble
Before you pull anything apart, run a quick flame test. Light the grill on high and look at the flame pattern after two minutes:
- Even blue flames with slight yellow tips: burners are clean. Move on to the next maintenance task.
- Yellow or orange flames with a lazy, lifting pattern: ports or venturi tubes are partially blocked. This is the most common sign of spider webs or grease carbon.
- Uneven flames, some ports dark: individual ports are clogged. Clean them with a paper clip.
- Flames that flare back at the control knobs: a venturi tube is blocked or a burner is misaligned. Shut off the gas immediately and do not use the grill until it is fixed.
Remove and Clean the Burner Tubes
- Close the gas supply at the propane tank or natural gas line valve. Disconnect the tank if you can move it away from the grill.
- Remove the cooking grates, flavorizer bars, and any heat shields to expose the burners.
- Take a photo of the burner orientation before removing anything. Reinstalling a burner backward is a common mistake that causes poor ignition.
- Lift each burner tube out. Most grills have a cotter pin or screw at the back and a slip-fit connection at the front over the valve orifice.
- Brush the tube exteriors with a nylon brush. Never use a wire brush that can widen the ports.
- Clear each port individually with a straightened paper clip or wire. Do not use a drill bit; it removes metal and permanently enlarges the port.
- Inspect the venturi tubes for spider webs, mud dauber nests, and debris. These are a common cause of weak or yellow flames, especially in grills stored outdoors.
- Check the igniter and pilot light connections while the tubes are out. Clean the igniter electrode with a soft cloth and check the gap against your owner's manual.
- Reinstall the burners in the same orientation, reconnect the venturi tubes over the valve orifices, and secure the retaining hardware.
Test for Leaks and Confirm Even Flames
After reassembly, do not just light the grill and walk away. Mix a tablespoon of dish soap with a cup of water and brush the solution onto every gas connection: the tank valve, the regulator, the hose, and the manifold. Open the gas supply and watch for bubbles. Bubbles mean a leak. Tighten the connection, re-test, and if bubbles persist, replace the hose or regulator before using the grill.
When to Replace Rather Than Clean
Cleaning restores most burners, but some are past saving. Replace a burner tube if:
- The tube is cracked, split, or has holes beyond the designed ports
- Flames remain yellow after a thorough port and venturi cleaning
- The venturi tube is corroded or pitted where it meets the valve
- The burner has warped and no longer sits level over the orifice
Visual Inspection Checklist: When to Clean vs. Replace
Some parts just need scrubbing; others are past saving. Run this inspection every time you deep clean.
- Cooking grates: clean if intact; replace if deeply pitted, cracked, or flaking
- Flavorizer bars: clean if coated; replace if rusted through or warped
- Burner tubes: clean if ports are clear; replace if cracked or flames stay yellow after clearing
- Grease tray: clean if stained; replace if bent or rusted through
- Igniter: clean contacts; replace if it will not spark after two attempts
- Venturi tubes: clean if dusty; replace if corroded at the valve connection
Gas Grill Maintenance Schedule: Monthly, Seasonal, and Annual
A gas grill maintenance schedule keeps deep cleaning from becoming a rescue mission. Most manufacturers recommend a burn-off after every cook, a grate scrub weekly, and a full breakdown at least twice a season.
| Frequency | Task | Time Needed |
|---|---|---|
| After every cook | Burn-off and grate scrape | 10 minutes |
| Monthly | Grease tray, drip pan, exterior wipe-down | 20 minutes |
| Seasonally | Full deep clean with burner inspection | 45-60 minutes |
| Annually | Replace worn brushes, inspect for corrosion | 15 minutes |
Winterization vs. Deep Cleaning
Deep cleaning and winterization are different jobs. A deep clean removes grease and carbon while the grill stays in service. Winterization prepares a grill for months of storage: clean it thoroughly first, then disconnect the propane tank, cover the unit, and store it dry. Skipping the clean before storage lets residue harden into a cement-like layer that takes twice the effort to remove in spring.
Frequently Asked Questions
How often should you deep clean a gas grill?
Deep clean your gas grill every 3 to 4 months during grilling season, or after about 15 to 20 uses. If you grill frequently, aim for a deep clean monthly. Regular maintenance like burn-off after each cook and scraping the grates prevents heavy buildup. A thorough deep clean at the start and end of the season keeps your grill safe and working well.
Can you pour water on a gas grill to clean it?
You can use water to clean a gas grill, but never pour it directly onto a lit or hot grill. For steam cleaning, preheat the grill, then apply water to a steam brush or the grates to create steam that lifts grease. Avoid soaking the burners or igniter. For exterior parts, use a damp microfiber cloth. Always ensure the grill is off and cool before using large amounts of water.
How do I remove carbon buildup from my grill?
Carbon buildup on grates and flavorizer bars comes off with a two-step approach: first, burn-off by running the grill on high for 15 minutes to turn residue to ash. Then, scrub with a wire brush or steam brush while the grill is still warm. For tough spots, apply a grill-safe degreaser or a paste of baking soda and water, let it sit, then scrub. Rinse and dry thoroughly to prevent rust.
Are you supposed to clean the inside of a gas grill?
Yes, cleaning the inside of a gas grill is essential for safety and performance. Grease and food particles inside the cookbox can cause flare-ups, uneven heating, and off flavors. Clean the cookbox, burner tubes, and grease tray regularly. Use a paint scraper for heavy residue and a wire brush for grates. Always disconnect the gas supply and let the grill cool completely before cleaning the interior.
What are the best tools for cleaning a gas grill?
The best tools for cleaning a gas grill include a sturdy wire brush or steam brush, a paint scraper, steel wool, microfiber cloths, and a bucket of soapy water. Safety gear like gloves and protective eyewear is a must. For burner tubes, a wire brush and a thin wire to clear ports work well. Steam brushes like those from Grill Daddy use water to melt grease without chemicals.
How do I clean burner tubes on a gas grill?
To clean burner tubes, first turn off the gas and remove the cooking grates and flavorizer bars. Inspect the tubes for clogs. Use a wire brush to scrub the exterior, then clear each port with a thin wire or paper clip. For venturi tubes, disconnect them and brush out any debris. Check for corrosion or cracks; replace if damaged. Reassemble and test for proper airflow before cooking.
What is a good gas grill maintenance schedule?
A good gas grill maintenance schedule includes: after each use, burn off residue and scrape grates. Monthly, deep clean grates, flavorizer bars, and grease tray. Every 3-4 months, clean burner tubes and cookbox. Annually, inspect all parts for wear, replace worn components, and consider professional servicing. Before winter, perform a deep clean and cover the grill to prevent rust and pest damage.
A dirty gas grill costs you flavor, fuel efficiency, and eventually the grill itself. Grill Daddy Brush Company built its steam-cleaning brushes to make that maintenance faster and safer: SAFE BRISTLE-LOCK technology means no loose wires near your food, the steam head works on stainless steel, ceramic, and iron grates, and every brush carries a lifetime warranty. Get started with Grill Daddy Brush Company and keep your grill cooking like new.


